

Make sure it is a hardback; otherwise you will cut all the way through the other side when you are cutting out the insides.
You'll also need:
- Elmer's white glue
- a container to hold glue solution (I've chosen a film canister)
- X-acto knife, and/or box cutter. Both if you have them
- brush to apply glue solution
- pencil/pen
- ruler, or other rigid straight edge
Select a page that you want to be the first one cut out, and save that page to be cut out at the end. (I'll explain later) Even if you don't want to save any pages at the beginning of the book, you must set one aside for a later step.
Mix a solution of white glue and water. Just enough for the glue to be runny, and absorbed by the edge of the book's pages. 50% to 70% glue (30% to 50% water) worked well for me. - Half a film canister full was enough for this book.
Holding the remaining pages together, brush the edges with the glue solution - enough to soak in pretty well, but not too drippy.
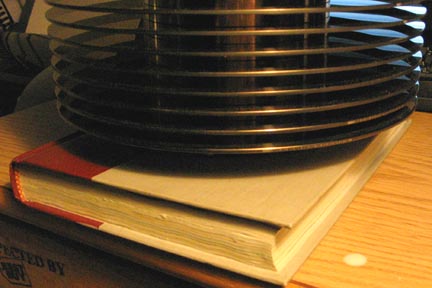
Allow this to dry, but use a spacer so the first couple pages, and the front cover don't get stuck. I spaced mine with post-it notes, and used some old hard disk platters to apply pressure. It dries quickly- about 15 to 30 min
When dry, open the book to the first glued page.
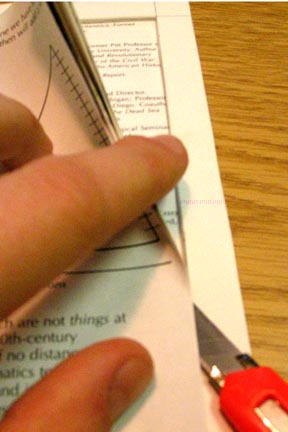
Draw out a half-inch boarder around the edge on all four sides. (Don't forget along the spine too.)

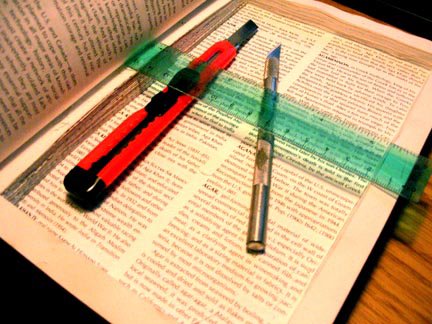
Using a strait edge and knife, cut out along the inside of the line. Try to make the cut as vertical as possible, or else try to tilt so the hole will narrow as you go down.

Continue cutting down through the layers. I found that a box cutter was easier to keep straight. This part takes a long time. I recommend listening to music while you work. Watching TV though could be distracting, and you could also cut a page out of your finger. (no, I didn't.)
The longer you spend on it, the smoother and straighter the inside edges of your book will be. My first attempts at this yielded rough edges, but the fuzz flattens down a little when glued (later).
After a while, you can store some of your tools in it while you take breaks. I did this book in 2 evenings.
When you get to the back of the book, and through the last page, stop. Dump out all the little paper fuzz that inevitably comes from the cutting.
Next, brush the glue solution on the inside edges of the pages. Give it a bit to soak in. A little bit of drippiness is okay, as the glue dries clear. This is also a good time to apply a second coat to the outside of the pages with the excess glue.

Brush the rim of the book with a light coat of glue. This will affix it to that one page we saved earlier (and will cut through later).

Close the book again, this time without any spacers. Give it another 15-30 minutes to dry. Clean up any glue that drips on your desk, like it did mine.
Remember that first page we saved? It’s now glued to the rest of the book. Lets all turn there now.
Cut through this first page with your knife to open it. The insides of the book may still be a little gooey since there was no air inside to let it dry. -So let it dry now.

When it’s dry, you're done!
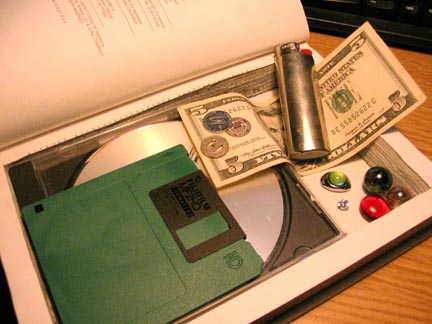
Fill it with whatever treasured items (or contraband) you choose.
Happy hiding.
No comments:
Post a Comment