Fret saw work: Stars, angels and reindeer as Christmas decorations for the Christmas tree or advents wreath.
How To Make a Secret Hollow Book

Make sure it is a hardback; otherwise you will cut all the way through the other side when you are cutting out the insides.
You'll also need:
- Elmer's white glue
- a container to hold glue solution (I've chosen a film canister)
- X-acto knife, and/or box cutter. Both if you have them
- brush to apply glue solution
- pencil/pen
- ruler, or other rigid straight edge
Select a page that you want to be the first one cut out, and save that page to be cut out at the end. (I'll explain later) Even if you don't want to save any pages at the beginning of the book, you must set one aside for a later step.
Mix a solution of white glue and water. Just enough for the glue to be runny, and absorbed by the edge of the book's pages. 50% to 70% glue (30% to 50% water) worked well for me. - Half a film canister full was enough for this book.
Holding the remaining pages together, brush the edges with the glue solution - enough to soak in pretty well, but not too drippy.
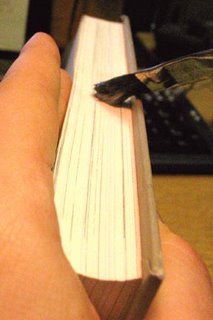
Allow this to dry, but use a spacer so the first couple pages, and the front cover don't get stuck. I spaced mine with post-it notes, and used some old hard disk platters to apply pressure. It dries quickly- about 15 to 30 min
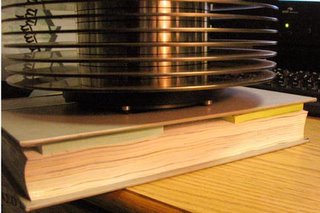
When dry, open the book to the first glued page.
Draw out a half-inch boarder around the edge on all four sides. (Don't forget along the spine too.)
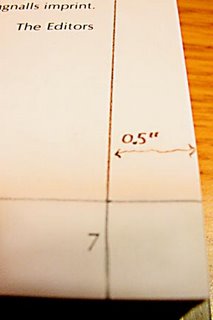
Using a strait edge and knife, cut out along the inside of the line. Try to make the cut as vertical as possible, or else try to tilt so the hole will narrow as you go down.
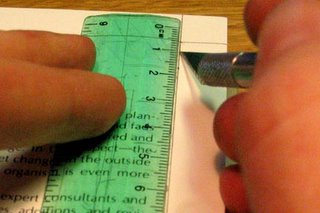
Continue cutting down through the layers. I found that a box cutter was easier to keep straight. This part takes a long time. I recommend listening to music while you work. Watching TV though could be distracting, and you could also cut a page out of your finger. (no, I didn't.)
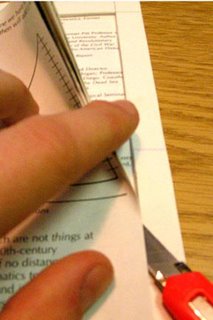
The longer you spend on it, the smoother and straighter the inside edges of your book will be. My first attempts at this yielded rough edges, but the fuzz flattens down a little when glued (later).
After a while, you can store some of your tools in it while you take breaks. I did this book in 2 evenings.

When you get to the back of the book, and through the last page, stop. Dump out all the little paper fuzz that inevitably comes from the cutting.
Next, brush the glue solution on the inside edges of the pages. Give it a bit to soak in. A little bit of drippiness is okay, as the glue dries clear. This is also a good time to apply a second coat to the outside of the pages with the excess glue.
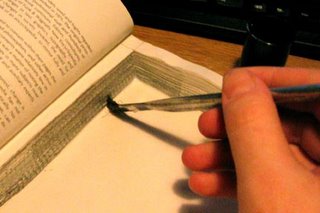
Brush the rim of the book with a light coat of glue. This will affix it to that one page we saved earlier (and will cut through later).

Close the book again, this time without any spacers. Give it another 15-30 minutes to dry. Clean up any glue that drips on your desk, like it did mine.
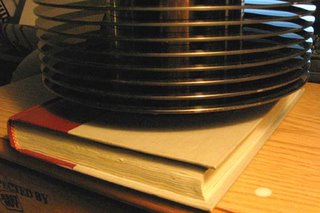
Remember that first page we saved? It’s now glued to the rest of the book. Lets all turn there now.
Cut through this first page with your knife to open it. The insides of the book may still be a little gooey since there was no air inside to let it dry. -So let it dry now.
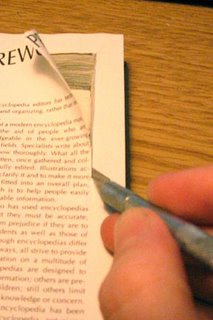
When it’s dry, you're done!
Fill it with whatever treasured items (or contraband) you choose.
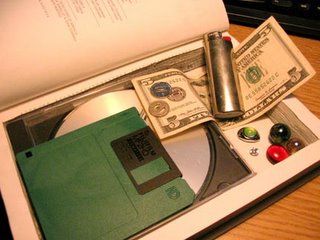
Happy hiding.
You love the look, now turn those gorgeous cranberries into easy Christmas crafts
You love the look, now turn those gorgeous cranberries into easy Christmas crafts
Cranberries aren't just for eating anymore. Try these 7 different uses to turn bags of fresh cranberries into easy Christmas crafts. They're colorful, fresh, and inexpensive to purchase. Don't settle for pre-made decorations when you can make your own. Here are a few ideas to spice up your home with cranberries this Christmas.
2. Cranberry garland: This traditional craft gets reinvented
Supplies
-- Fresh cranberries
-- Fishing line
-- Sewing needle
--Scissors
Directions
1. Feed your fishing line through the eye of the needle.
2. String through the ends of each berry, pushing each cranberry onto the string until you reach your desired length.
3. Cut the line when you reach the length you want. Tie the ends in a firm knot.
Cranberry garland looks fabulous strung from the mantle, through the chandelier, or around the tree. Whatever you choose this easy Christmas craft for, you're guaranteed to love it.
3. Flowers with cranberry accents
Supplies
-- Vases of various shapes
-- Red flowers: poinsettias, roses, daisies, tulips, etc.
-- Water
-- Cranberries
Directions
1. Prune your flowers to the desired length of stems. Arrange flowers in each vase.
2. Depending on the desired look you can do either of the following. If you're using multiple vases, I would consider doing both options.
-- Fill the vase with cranberries and then fill with water. This give you a very-merry- berry look.
-- Fill the vase with water and then place a layer of cranberries to float atop the water.
Proudly display your vases in the entry way or as centerpieces on your buffet. Use these easy Christmas crafts to accent any surface of your home.
4. Frozen cranberry wreaths
For locations where the weather gets below freezing, this wreath is a fun twist to the traditional adornment on your front door.
Supplies
-- Bundt pan
-- Water
-- Cranberries
-- Ribbon
Directions
1. Fill the bottom of your bundt pan with water (1-2 inches).
2. Place cranberries throughout the water.
3. Freeze your pan. Once the water is completely frozen, and you're ready to display your wreath (it won't last long!), remove from the freezer. Carefully pop your ice wreath from the pan.
4. String a ribbon through the middle of the wreath and tie in a knot. Use this ribbon to hang the wreath from the door.
Be sure to check back on your wreath after some time has passed. You'll probably have a handful of cranberries lying on your front porch!
5. Cranberry wreath
For those who don't live in freezing (or even cold) areas, try this wreath!
Supplies:
-- Styrofoam wreath
-- Toothpicks
-- Cranberries
-- Black paint
-- Paint brush
Directions:
1. Paint your wreath black and allow to dry.
2. Break the toothpicks in half while you wait for the paint to dry.
3. Once the paint is dry, stick your toothpicks into the Styrofoam wreath, about a half inch deep.
4. Place a cranberry on each exposed end of the toothpick. Fill the wreath in this manner, placing your cranberries as close together as possible.
Sting this wreath from the door, window, or lie flat around some candles on the table. Whichever you choose, your easy Christmas crafts will look fantastic!
6. Cranberry candles
Mix these among your cranberry flower vases for an extraordinary and festive look.
Supplies
-- Glass hurricanes or glass bowls
-- Water
-- Floating candles
-- Cranberries
Directions
1. Fill your hurricane or bowl with water.
2. Lay the candles and cranberries in the water and let them float.
3. Light the candles when you're ready to entertain!
7. Cranberry ice cubes
This is a charming treat to any beverage! These are gorgeous and impressive.
Supplies:
-- Ice trays
-- Water
-- Cranberries
Directions:
1. Freeze a few cranberries into each ice cube hole in the tray. Don't stuff it full or you won't be able to hold them in place within the ice.
2. Use these in party beverages, tea, or water to add color to any drink.
Enjoy the festive look the cranberries give to your house, and your guests will admire the decor. Savor their reaction when you tell them you made these easy Christmas crafts decorations yourself! And have a Merry Christmas!
Baby Girl Shower Invitations
Where to Start...
The best place to start when making your own baby shower invitations is to choose some paper. A really economic way to create invitations is by using cardstock. By cutting, scoring, and folding cardstock you can create the base of a handmade card. You can even purchase cardstock in different thichkness, colors, and even textures at places like office supply stores and arts and crafts hobby stores. You'll find cardstock in every color under the sun at an arts and crafts supply, as well as textures like embossed and even glitter cardstock.
For a quick and easy option you can purchase blank cards to use as the base for your homemade baby shower invitations. These are cards that are already scored and folded and many times come with the correct size matching envelope. They are completely blank inside and out. Just decorate them, print or stamp the invitation wording to the inside and you are done!
I also like to create matching envelope liners and glue, stamp, or print an image to the outside of the envelope.
Creating Hanmdade Baby Girl Invitations
Any of the ideas and tutorials on this site can be used to create baby girl shower invitations. Simply switch up the papers to a baby girl theme and viola! Use the ideas and tutorials as inspiration but you do not have to stick by the book. Get creative and make your invitations your own!
Search for baby girl or theme inspired rubber stamps, paper punches, ribbons, and papers. Mix and match colors, shapes, and textures!
Baby Girl Shower Invitations Inspiration...
| | |
| Cardstock | Rubber Stamps |
| Die Cuts | Cute Brads |
Baby Girl Shower Theme Ideas
Whimsical Flower Garden Vinyl Wall Decals Stickers Art Graphics
This decal is 11" high by 11.3" wide and will come in the color of your CHOICE! Please contact me with your color choice at singlestonestudios [!at] yahoo.com - we now have 27 colors! See our palette above.
ABOUT OUR WALL DECALS:
Each decal is made of high quality, self-adhesive and waterproof vinyl.
Our vinyl is rated to last 5 years outdoors and virtually forever indoors.
Decals can be applied to any clean, smooth and flat surface. Put them on your walls, doors, windows - anywhere you want!
Much faster, cleaner and easier than painting.
Use various decals and colors to create a unique design!
SHIPPING:
NO ADDITIONAL SHIPPING CHARGES FOR ADDITIONAL ITEMS! ALL ORDERS OVER $150.00 PAID ON ONE INVOICE RECEIVE FREE SHIPPING!
Orders ship within 24 hours of receipt of payment.
Allow 3-5 business days for delivery via USPS Priority Mail for domestic orders.
We ship worldwide from the USA!
PAYMENT:
Please remit payment within 3 days of ordering.
We accept Visa, Mastercard, Discover, American Express and PayPal.
We also accept money orders. Please contact us for further information.
APPLICATION INSTRUCTIONS:
Our vinyl wall art decals are easy and fun to install.
Complete and simple step-by-step instructions are included with your order.
ADDITIONAL INFO:
We can custom size most designs to your specifications.
Please contact us for an estimate.
We can also create custom word art (for example - favorite phrases, names, Bible verses, etc.) Contact us for more information.
Send us a photo of your new wall designs. We are currently building a customer design gallery and would love to display yours on our blog.
We have a TOTAL SATISFACTION guarantee. If, for any reason, you are not 100% satisfied with your purchase, you can return any unused decals to us within 7 days of purchase for a full refund of the purchase price (less shipping).
Enjoy your new vinyl wall decals!
Thank you for choosing Single Stone Studios!
