Showing posts with label craft idea. Show all posts

Poodle craft template


Poodle CraftYou can make this cute little dog with sole, Funky Foam or thick paper. The important thing is you must adjust the hole to fit with your craft material thickness.
Tool and Craft Supplies :
  • Printer
  • paper crafts or sole
  • Scissors
  • Glue

Step to make:
1. Print the Poodle template
2. Duplicate body and legs template
3. Construct your craft template
4. Use glue as necessary
5. Your poodle craft is ready to play

Craft Poodle template

Rock Jack-O-Lantern Craft

Follow these directions and make a jack-o-lantern out of a rock. You can make several jack-o-lanterns and pumpkins of all shapes and sizes.

Age Guideline: 5 Years and Up
Time Required: 30 minutes (Does not include drying time)

The above age and time guidelines are estimates. This project can be modified to suit other ages and may take more or less time depending on your circumstances.


Materials Needed:
Rock
Paint
Twig
Craft Glue
Paint Brush

Instructions:
Start out by searching for a rock. The rock can be any size or shape you want your jack-o-lantern to be, you just might want to make sure it can sit up the way you want it to. Clean the rock and dry it completely.

Paint the rock orange. It may take a few coats of paint. Let the paint dry.

Use black paint to make a face on your jack-o-lantern. If you need a little inspiration, check out these pumpkin carving patterns. I used brown paint to make lines down my jack-o-lantern just to add some extra detail.

Finally, use a small piece from a twig as a stem glued on top of your jack-o-lantern.

Re-Made Diffuser Bottle Craft


How to Decorate and Personalize an Empty Diffuser BottleRe-Made Diffuser Bottle CraftSubmitted by Stella Stella explains how she transformed an empty diffuser bottle into a colorful and useful work of art. Stella thinks this is a very easy project and a great way to recycle bottles, and I couldn't agree more! Age Guideline: 8 Years and Up Time Required: 60 minutes (Does not include drying time) The above age and time guidelines are estimates. This project can be modified to suit other ages and may take more or less time depending on your circumstances. Materials Needed:
One empty diffuser bottle Sea Shells Glass Beads Blue Stained Glass Cobbles E6000 Glue Craft Stick - (for applying glue) Instructions:
Clean the bottle of all labels and glue. Lay the bottle down flat on your work surface. Stella used a towel to hold hers in place. Glue on the glass cobbles. Glue on the sea shells. Glue the on beads. Let the glue dry completely before moving or using the diffuser bottle.

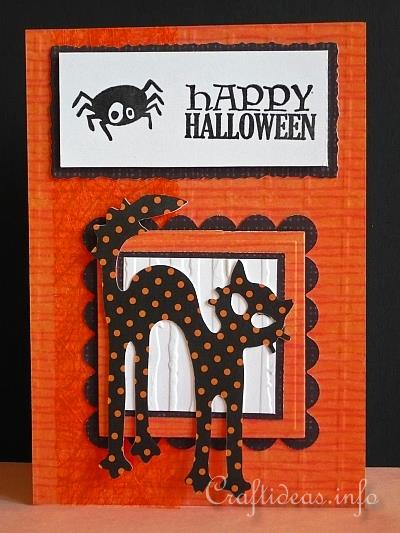
Halloween Card to Craft - Happy Halloween Card


Halloween Card to Craft - Happy Halloween Card With Spotted Black Cat This spooky black cat looks unique with its orange spots. You can of course substitute any Halloween paper you like if you would prefer a different look.

In just a few minutes this card using scrapbook paper, die cuts and clear stamps will be completed and ready to give.
Supplies Needed: - white card - orange patterned scrapbook paper and black scrapbook paper covered with orange spots - white cardstock - Sizzix Big Shot - Sizzix dies “Squares, scallop #2” and “Cat and Moon” - Sizzix embossing folders of choice (to emboss the orange card background and the white square background behind the cat) - Fiskars clear stamp set “Halloween Night” (see picture below) - black pigment stamping ink - clear embossing powder - orange fiber ribbon - quilter’s ruler or standard ruler - craft cutting knife - decorative edged scissors - 3-D foam tape - stick glue This is the stamping set from Fiskars that was used for the card. Instructions: 1. Cut and emboss a sheet of orange patterned scrapbookpaper to cover the front of the card. 2. Cut a piece of fiber ribbon to fit the card lengthwise and glue it using stick glue to the left side of the card. 3. Die cut the larger black patterned paper scallop out using the Sizzix die and set it aside for the moment. 4. Cut 2 orange patterned paper squares measuring 6 and 6.5 cm and glue the smaller square centered onto the larger square. 5. Cut a black square measuring 5.2 cm and glue it centered onto the smaller orange square. 6. Cut and emboss a white square measuring 4.8 cm and glue it onto the black square. 7. Now take the square “sandwich” and adhere it onto the black scallop using 3-D foam tape. 8. Die cut a cat from the spotted paper and adhere it onto the squares. 9. Stamp and emboss the Halloween message and a spider onto a 3.5 x 8.3 cm rectangle. Adhere the rectangle onto a piece of black patterned scrapbook paper and cut it out with a 4 mm border using the decorative edged scissors. Now adhere the rectangle to the top of the card. 10. Glue the scallop onto the card below the rectangle.

Plushie - Standing Dog


Matterial

1/2 yard of polar fleece or woolen felt
2 buttons for eyes
1/2 inch ribbon for bow
Toy filling
2 skeins of embroider thread


This sewing pattern shows you how to make a standing dog plushie which makes a great snuggle baby toy.

Using the pattern below print off the pattern sheets to fit onto an A4 sized paper.

Dog Plushie Pattern 1

Dog Plushie Pattern 2

Cut out all your pattern pieces following the pattern sheets.

This pattern is sewn together using embroidery thread in a blanket stitch finish. You could also sew this pattern together using a sewing machine.

Sew inner leg to the body piece on both legs.

Sew down the back seam,

Sew in the tummy gusset

Sew soles to the bottom of the feet.

Assemble the head -

Stitch the head gusset to both sides of the head, the gusset goes from the nose to the back of the neck.

Sew the button eyes into place

Stitch the ears into place

Stitch the head to the body leaving a gap for filling.

Using toy filling stuff the dog to suit your plumpness. Finish off by sewing the bottom closed.

Light Bulb Reindeer Craft


Use these free directions and pattern to create a reindeer Christmas tree ornament using an old light bulb.

* Age Guideline: 6 Years and Up
* Time Required: 30 minutes (Does not include drying time)

The above age and time guidelines are estimates. This project can be modified to suit other ages and may take more or less time depending on your circumstances.


Materials Needed:

* Light Bulb
* Newspaper
* Paper Mache Paste
* Paint
* Craft Foam or Felt
* Ribbon
* 3/4-Inch Red Pom-Pom
* Craft Glue or Hot Glue Gun and Glue Sticks
* Paint Brush
* Scissors

Instructions:
I put 3 layers of paper mache on my light bulb first. Read this article about how to paper mache.

Paint the light bulb with brown paint. Let the paint dry completely. I set the neck of the light bulb into an empty film container. This worked great while the paint dried!

With the neck of the light bulb pointing up, paint eyes and a mouth on the reindeer. Glue on the red, pom-pom nose.

Cut two antlers out of fun foam or felt using the pattern below. Glue one to each side of the light bulb neck.

How to Make Your Own Bath Salts

Sheryl explains how to make colored bath salts. A fun gift idea.

Materials:

  • Bottle or Jar
  • Epsom Salts
  • Food Coloring
  • Perfume or Essential Oil

Instructions:
Combine the desired amount of Epsom salts (enough to fit in your bottle or jar) with food coloring. Mix well so color is even. Add your perfume or essential oil and mix again. Spread the mixture out on a sheet of wax paper to dry for a couple of hours and then put it in the bottle or jar.

While the salts can be used right away, the perfume or essential oil will blend better with the salt if it is allowed to set in the jar for a few weeks.

Fret saw work: Stars, angels and reindeer as Christmas decorations for the Christmas tree or advents wreath.

Stars, angels and animals are drawn onto an approx. 3-4 mm thick piece of plywood and then cut out with a saw. The sharp edges should be sanded and rounded off with sandpaper. A small hole for the thread should be made with a small hand drill. To finish, the stars, angels or animals can be painted or simply left in their natural form. They are then ready to hang on the Christmas tree.
Crafts with childrens: Fret saw work Fret saw work crafts Animals fret sam work

Christmas gnomes

Little Christmas gnomes can be made from peanuts and cotton wool using a felt tip pen. You could even make an advent calendar with 24 little sacks held in place with a clothes peg and decorated with a Christmas gnome. 
Little Christmas gnomes can be made from peanuts and cotton wool using a felt tip pen. You could even make an advent calendar with 24 little sacks held in place with a clothes peg and decorated with a Christmas gnome. A piece of felt can be used as a hat, a bit of cotton wool for the beard and a face should be drawn on with a felt tip pen. For the advent calendar, you will require 24 little felt bags with a treat inside.