Rock Jack-O-Lantern Craft
Make a Photo Album OUt of a CD Jewel Case
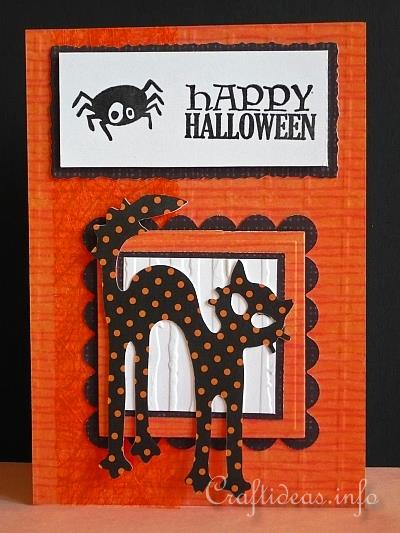
Halloween Card to Craft - Happy Halloween Card
Halloween Card to Craft - Happy Halloween Card With Spotted Black Cat This spooky black cat looks unique with its orange spots. You can of course substitute any Halloween paper you like if you would prefer a different look.
In just a few minutes this card using scrapbook paper, die cuts and clear stamps will be completed and ready to give. Supplies Needed: - white card - orange patterned scrapbook paper and black scrapbook paper covered with orange spots - white cardstock - Sizzix Big Shot - Sizzix dies “Squares, scallop #2” and “Cat and Moon” - Sizzix embossing folders of choice (to emboss the orange card background and the white square background behind the cat) - Fiskars clear stamp set “Halloween Night” (see picture below) - black pigment stamping ink - clear embossing powder - orange fiber ribbon - quilter’s ruler or standard ruler - craft cutting knife - decorative edged scissors - 3-D foam tape - stick glue This is the stamping set from Fiskars that was used for the card. Instructions: 1. Cut and emboss a sheet of orange patterned scrapbookpaper to cover the front of the card. 2. Cut a piece of fiber ribbon to fit the card lengthwise and glue it using stick glue to the left side of the card. 3. Die cut the larger black patterned paper scallop out using the Sizzix die and set it aside for the moment. 4. Cut 2 orange patterned paper squares measuring 6 and 6.5 cm and glue the smaller square centered onto the larger square. 5. Cut a black square measuring 5.2 cm and glue it centered onto the smaller orange square. 6. Cut and emboss a white square measuring 4.8 cm and glue it onto the black square. 7. Now take the square “sandwich” and adhere it onto the black scallop using 3-D foam tape. 8. Die cut a cat from the spotted paper and adhere it onto the squares. 9. Stamp and emboss the Halloween message and a spider onto a 3.5 x 8.3 cm rectangle. Adhere the rectangle onto a piece of black patterned scrapbook paper and cut it out with a 4 mm border using the decorative edged scissors. Now adhere the rectangle to the top of the card. 10. Glue the scallop onto the card below the rectangle.
Plushie - Standing Dog
Matterial
1/2 yard of polar fleece or woolen felt
2 buttons for eyes
1/2 inch ribbon for bow
Toy filling
2 skeins of embroider thread
This sewing pattern shows you how to make a standing dog plushie which makes a great snuggle baby toy.
Using the pattern below print off the pattern sheets to fit onto an A4 sized paper.
Cut out all your pattern pieces following the pattern sheets.
This pattern is sewn together using embroidery thread in a blanket stitch finish. You could also sew this pattern together using a sewing machine.
Sew inner leg to the body piece on both legs.
Sew down the back seam,
Sew in the tummy gusset
Sew soles to the bottom of the feet.
Assemble the head -
Stitch the head gusset to both sides of the head, the gusset goes from the nose to the back of the neck.
Sew the button eyes into place
Stitch the ears into place
Stitch the head to the body leaving a gap for filling.
Using toy filling stuff the dog to suit your plumpness. Finish off by sewing the bottom closed.
Light Bulb Reindeer Craft
Use these free directions and pattern to create a reindeer Christmas tree ornament using an old light bulb.
* Age Guideline: 6 Years and Up
* Time Required: 30 minutes (Does not include drying time)
The above age and time guidelines are estimates. This project can be modified to suit other ages and may take more or less time depending on your circumstances.
Materials Needed:
* Light Bulb
* Newspaper
* Paper Mache Paste
* Paint
* Craft Foam or Felt
* Ribbon
* 3/4-Inch Red Pom-Pom
* Craft Glue or Hot Glue Gun and Glue Sticks
* Paint Brush
* Scissors
Instructions:
I put 3 layers of paper mache on my light bulb first. Read this article about how to paper mache.
Paint the light bulb with brown paint. Let the paint dry completely. I set the neck of the light bulb into an empty film container. This worked great while the paint dried!
With the neck of the light bulb pointing up, paint eyes and a mouth on the reindeer. Glue on the red, pom-pom nose.
Cut two antlers out of fun foam or felt using the pattern below. Glue one to each side of the light bulb neck.